Enlargement of 5"x7" plate on Ilford Multigrade FB
Dry Plate Recipes |
| Back to 'Dry Plate Photography Index' | Previous | Next |
|
|
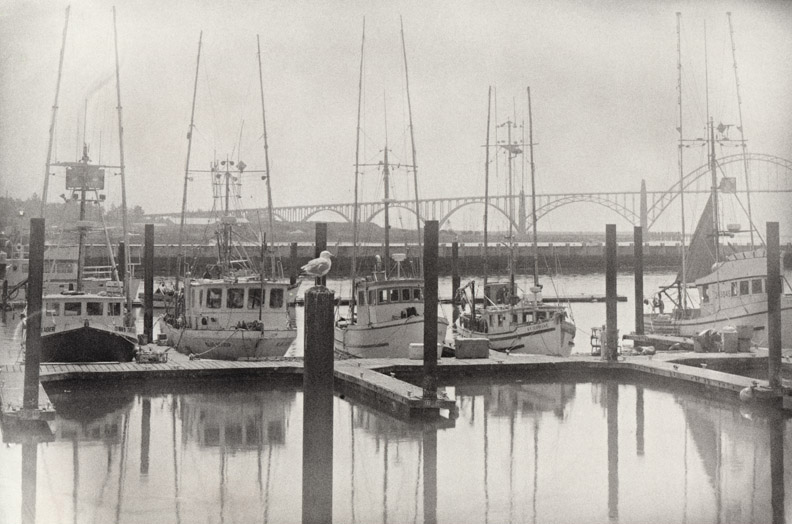
'Sunbow Over the Bayfront '
Enlargement of 5"x7" plate on Ilford Multigrade FB
|
|
'Plates may be divided roughly into four classes: (i) very slow, for copying and photo-mechanical work; (ii) slow plates, to which perhaps the term "Ordinary" is most generally applied; (iii) medium rapidity plates, including the so-called extra-rapid and snapshot varieties; and (iv) extremely fast plates — a class which has arisen during the last year or two.' 'There are many makes of plates, and each one varies in speed, and as we know, slow plates are generally cleaner than fast ones, i.e., freer from fog, and there are a multitude of differences in the characters of quick and slow varieties...' 'The slower the plate, the bigger error can we safely make in exposure, the pluckier the result, and the cleaner.' 'Now a slow plate may be given twice the proper exposure, or even three times, and yet turn out well, whilst a rapid plate which has been three times over-exposed will be so flat that it is useless as a negative." 'Slow plates should therefore be used in all cases where a bright, contrasty, clean negative with very fine grain is wanted, and in the summer months, if only more slow plates were used, there would be far fewer failures.' Successful Negative Making, 2nd Edition, by T.Thorne Baker, 1905. |
Two Emulsions, Many Possibilities |
|
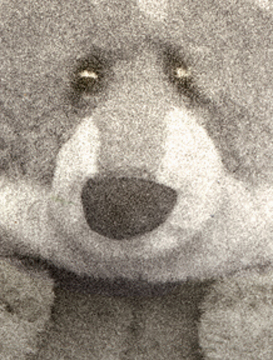
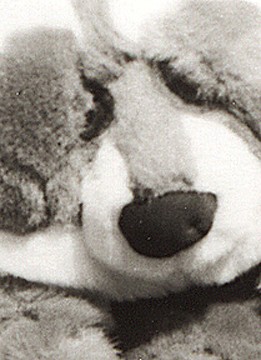
Since early summer (2008) I have been working with two basic emulsions, what I'm calling TLF 1 and TLF 2. They are simple emulsions, and except for the addition to both of Steigmann's gold sensitizer (from the 1950s, I believe), the emulsions are classic, old-style brews. They are easy to make, with basic chemicals, and as minimally dangerous or toxic as these things get. I will continue to research optional optical sensitizers, but as they stand in their basic form, they are well up to the task of dry plate photography. Jim Browning and Terry Holsinger offer additional great options. It is my hope, of course, that others will start making their own vintage brews and share the results. 'Sunbow Over the Bayfront' is an example of TLF 2. The plate was exposed for only 1 second at f/32. It was a sunny day and the plate is badly overexposed. I tried to get as much contrast as possible out of the image, but the lighting in the final print appears flatter than it actually was on location. Although TLF 2 is considerably faster than TLF 1, it still has to be considered a 'slow' emulsion, and I think the situation with 'Sunbow...' confirms Baker's contention that slow is the way to go. Here is a plate so overexposed that it looks almost black on a light table and it still produced a decent print. Notice the classic difference between a 'fast' film and a 'slow' film. The image below on the left is a crop from 'Sunbow...' and the one of the right is a crop of the same size and % enlargement from 'Pancho & Herman', the image that opens the Dry Plate Photography section, a plate made with TLF 1. TLF 2 displays the visible grain that you'd expect in an 8"x10" enlargement from 35mm TriX, especially when it is overexposed as 'Sunbow...' was. TLF 1 is essentially grainless. The contrast characteristics of the two emulsions also follow the classic features of fast vs. slow. There is more information on controlling characteristic curves in the following sections. |
 |
 |
|
The Light Farm Glass Negative Emulsion #1 |
|||||||||||||||||||||||||||||||||
|
Modified from Photographic Emulsion Technique, 2nd Ed
Note: This recipe has been modified from the original version in the 'Glass Negative' Section. |
|||||||||||||||||||||||||||||||||
|
For Approx. 200 ml of emulsion. That's about 16 4"x5" plates, or 10 5"x7" plates, or 8 Whole plates (6.5"x8.5"). Preheat a waterbath on a magnetic hot plate to 45C. Weigh out ingredients.
In a beaker (150 to 250 ml size) or a container that is easy to scrape out, swell gelatin at least 30 minutes at room temp.
In 250ml beaker, swell gelatin 30 min. Add:
Melt to 43C in waterbath, with occasional, gentle stirring.
Measure 5 ml ammonia into a 10 ml graduate cylinder. Have a dropper bottle of ammonia ready and waiting. Dissolve the silver in the water (by stirring with the handle of an impeccably clean plastic spoon). Slowly, with stirring, add 5 ml ammonia. (Excellent ventilation is a very good thing here.) With the first few drops of ammonia, the solution will turn a muddy black from the precipitate that is formed. After the first 5 ml has been added, starting with two drops at a time, add more ammonia, stirring and observing after each addition. When you see that the solution is starting to clear, slow the addition to one drop at a time, with stirring. The ammonia is dissolving the precipitate. There will only be one drop between being able to see a few remaining black flecks and total clearing. It is important to avoid excess ammonia. When the solution is clear, cover (I set a glass coffee cup saucer on top) and set aside at room temp.
Dissolve, cover, and hold at 43C. Turn the heat off the waterbath. Make sure the temperature is not above 43C. If it is, add a little ice water. (I keep a wash bottle in the refrigerator to cool down the water bath if necessary. Temperature control is our friend.) Under red or dark amber safelight: Making sure you know which is which, have Parts B and C at the handy. Over 5 seconds time, with slow stirring, add Part B to Part A through a small funnel held right above the gelatin mixture. Immediately add Part C in the same manner. Stir an additional 30 sec. Stop stirring. Pull the waterbath off the hot plate. Ripen the mixture without stirring for 15 minutes. Make sure the waterbath temperature stays between 40 and 43C. (Make a note of the temperature curve over the 15 minutes for future reference and recipe refinement.) Note: There are a number of variations to the above. You can add B with a monoject syringe, like in making paper, and then follow with C in another syringe, or a stopcock buret. Each technique will yield its own characteristic results. Experiment freely. Take good notes. Add 2 drops 10% KI. Fluff (or chop, if necessary) the Part D gelatin. Sprinkle/scrape it into the hot mix. Gently press in under the surface and give a gentle stir. Ripen without stirring another 15 minutes. (With a gentle stir and scrape from the bottom every 5 minutes.) The heat should stay between 40 and 42 degrees. It may be necessary to slide the waterbath back onto the hot plate. Pour the melt into a ziploc sandwich bag resting in ice water. Seal bag. Refrigerate in a light proof container 4 - 24 hours. (You probably can leave the emulsion for up to a week, but time is an emulsion variable. The emulsion will fog if you hold it too long.) Second Session: If you are planning on coating immediately after washing the noodles, preheat the waterbath on the magnetic hot plate to 55C. Have a 400 ml beaker ready. Washing the gelatin: Under safelight, put the baggie of refrigerated silver gelatin in another lightproof container at room temperature and let warm a bit (approx. ½ hour). It will be too stiff to noodle otherwise. Bear in mind the time/temperature component of ripening. You don’t want the gelatin to get too warm or sit around too long or the sensitivity curve will become an unknown — at the worst to the point of fog. If the lump of gelatin is still too hard to squeeze through the ricer when you get started, you can tear off smaller pieces with your fingers, making very sure you don’t drop any. Have a large quantity of ice water available (tap water or filtered, depending on your water quality — distilled is not required and may even be detrimental). I fill a Coleman drink container with crushed ice from the corner market and keep it covered with tap water through the washing cycles. Set a cotton jelly straining bag in a half gallon size Coleman cold thermos, turning the top of the bag over the edge of the thermos. Pull the drawstring securely and tie with a bow tie. Fill with ice water (strain out any pieces of ice). Set the open potato ricer bowl in the ice water in the thermos. Go to safelight. Open the baggie of gelatin and turn it out into the ricer bowl. Keeping the ricer holes under the ice water, squeeze out the threads/’noodles’. With a little rubber scraper or plastic spoon make sure all the gelatin gets into the jelly bag. Pull the drawstring very tight and tie in a bow tie. Wrap the neck tightly with a rubber band. Drop the bag in the ice water and put the lid securely on the thermos. Over the next approximately 1 and a half hours, wash the noodles. (Note: I have checked the pH after each 5 minute change of water, and the pH lowering curves were identical from 10 to 7.8 for two separate trials. You need to get the pH between 7 and 8, but overwashing is to be avoided. I don’t think it is necessary to check the pH if a careful and consistent wash cycle is maintained.) Set a timer for 5 minutes, and agitate the thermos like you would a big cylindrical film development tank. This is much harder to describe than to do: Hold the thermos horizontally in front of you, one hand on the bottom and one hand on the lid. Tip back and forth with a quarter-clock rotation with each tilt. This is a gentle exercise; it just assures that the water is moving inside the container, but not beating up on the contents. After 5 minutes, open the thermos and pour off the old water. Remove the jelly bag and gently squeeze out some of the water. (The point isn’t to squeeze it completely dry). Strain in new ice water and repeat cycle. It takes me about 1-1/2 hours to make 12 water exchanges. For the first two 5-minutes washes, I agitated the entire time. After that I agitated one minute, let the thermos sit for three minutes and agitated again during the last minute. Since the thermos is light tight, this allows time for breaks and for staging the coating process. Just make sure to go back to safelight each time the thermos is opened. After the last wash, remove the bag and squeeze out as much water as possible with the potato ricer (cleaned thoroughly since ricing step). Then, roll the bag in a cold, clean terry towel, and gently knead a minute. (I keep a terry towel in a plastic bag in the freezer until the last noodle washing session.) Open the bag and carefully turn the noodles into a 400ml (or larger) beaker (a wide mouth plastic canning funnel helps). Have a bowl of ice water and a gold mesh coffee filter at hand. Turn the bag inside out under the ice water and agitate gently to wash the noodles off the bag. Strain the wash water through the coffee filter and return the captured noodles to the beaker. Check the sides of the funnel and scrape down any noodles that have clung to the sides. (Note: don’t wash them down.) The point of all this is to get as many last pieces of silvered gelatin as possible. The gelatin/water balance will greatly affect the coating process. Digestion/Chemical Ripening and CoatingSet the beaker in the 55C waterbath. Watch the temperature of the bath. It will immediately drop below 40C. Turn the heat up and place a separate thermometer in the gelatin. Gently stir the gelatin every 5 minutes until it hits 40C. (With the handle of a plastic spoon, slowly sweep clockwise around the inside of the beaker, make an X across the bottom, followed by another slow sweep around the sides, this time counterclockwise.) Drop in a magnetic stirring bar and add 6-7 drops Steigmann standard aurous ammonium thiocyanate solution 1 Slowly stir for one minute. Complete digestion without stirring: Continue to bring up the temperature of the waterbath to 52C, keeping a watchful eye. When the temperature of the emulsion hits 50C start to bring the temperature of the waterbath up to 53C and begin to gently stir the emulsion. The emulsion will probably hit 52C before the waterbath hits 53C. Have ice handy to drop into the waterbath if the temperature overshoots 53C before the emulsion hits 52C. When the emulsion hits 52C, remove the beaker from the waterbath. With a gentle stir every 5 minutes, watch the temperature until it hits 40C. Stir in thoroughly, 6 ml Everclear Strain through a gold mesh coffee filter into another 400 ml beaker set in a waterjacket at 36 -38 C. Coat plates or film. Turn out all the lights and go away for 8-plus hours. If you are coating plates arranged on a silicon mat, you will need to lift them off after 8 hours and prop them up or lay them on a screen so that any emulsion that spread to the back of the plate can dry before loading or storage. Footnotes 1) Steigmann standard aurous ammonium thiocyanate solution: From SPSE Handbook of Photographic Science and Engineering, Edited by Woodlief Thomas, Jr., 1973, pp 518-519. Add 6.0 ml of a 1% gold chloride solution to 50 ml of a 1% ammonium thiocyanate solution, allowing it to clear before using. (Store in dark dropper bottle.) |
 |
|
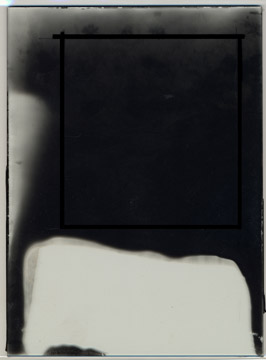
'Rosie's Place'
Enlargement of 5"x7" plate on Ilford Multigrade FB
|
|
I haven't done as much work with TLF#2 as with TLF#1, although both 'Sunbow...' and 'Rosie's Place' were made with this recipe. It is a fast emulsion. It is also prone to grain and fog, but I'm looking forward to learning its full potential. I know I liked being able to catch the seagull in 'Sunbow...' (1 sec at f/32. Another exposure at 1/2 sec was better, but still a little dense, except the seagull lost patience with me.) |
Full-Ammonia Bromide Emulsion Formula (TLF #2) |
|||||||||||||||||||||||||||||||||||||
|
1) Preheat a waterbath jacket on a magnetic hot plate to 45C. 2) Hold a waterbath pan at 40C on a temperature-controlled hot plate. 3) Weigh out all chemicals.
Procedure: Allow gelatin to soak in cold water 30 min; place in 40C waterbath, then stir while warming to 40C to dissolve. Add KBr and KI solution. Cover and leave sitting in the waterbath. Watch the temperature.
Procedure: Add the ammonium hydroxide slowly with stirring until the brownish-black silver hydroxide precipitate that forms has just re-dissolved. Avoid excess ammonia. (*After 5ml, add the ammonia by the drop, stirring thoroughly after each addition, until the solution clears.)
Precipitation, emulsification and first/physical ripening: Procedure: Under safelight. Stir Part I rapidly* and with a syringe add half (10 ml) of Part II near the bottom of the beaker. Ripen 45 minutes at 45C, stirring for 30 seconds after 15 minutes and again 15 minutes later. (Procedure for Part III gelatin: Right after the second stirring, pour the cold water over the gelatin.) Then, stirring rapidly, with a syringe add the rest of Part II to Part I. Stir 30 seconds and then add 2 drops 1% KI. Stir for one minute. Pour this mixture over Part III and place the beaker in the waterbath. Warm to 45C with gentle stirring, then ripen 15 minutes. Pour into a ziploc sandwich baggie set in ice water in a lightproof container. Store overnight to a week under refrigeration.
Preheat magnetic hot plate to 40C. Under safelight: Noodle the cold emulsion. Wash in ice water with twelve x 5 minutes each, water exchanges. While the noodles are still in the jelly bag, after the last washing use the rinsed out potato ricer to squeeze out as much water as possible. Then, roll the bag in a clean, dry terry towel and knead for a minute to get out more water. Open the jelly bag and turn the noodles out into a cold, stainless steel, lightproof container. (A 16oz film developing tank works great.) Sprinkle 7g dry gelatin over the top of the noodles and gently stir. Don’t worry about completely mixing it in. Store the noodles up to a week, or let rest at least 30 minutes under refrigeration, before digestion and coating. Digestion/Chemical ripening and coating:Preheat magnetic hot plate waterbath to 52C, with 250 ml beaker and stirring rod. Under safelight: Add the noodles to beaker and bring up to 40C with gentle stirring. Add 4 drops Steigmann’s gold sensitizer, stir one minute. Bring temperature up to 52C as quickly as possible without the waterbath ever overshooting 53C. (When the emulsion hits 50C, start to bring the temperature of the waterbath up to 53C. The emulsion will probably hit 52C before the waterbath hits 53C.) With stirring, add 6 ml Everclear. Strain through two nested gold mesh coffee filters into a clean beaker. Coat at 32-35C. Experience with your own workflow will determine whether you need to keep the emulsion nested in a waterbath while you coat.
Recipe modifications to try
|
|||||||||||||||||||||||||||||||||||||
Making Lemonade |
|
|
As with all things handmade, there will be any number and variety of less-than-perfect results. The good news is that there are very few dry plate oops!'s that can't be salvaged. You can crop — either with a mat or in the enlarger or with Photoshop. And, you can be flexible with your printing methods. A good plate can be scanned, photographed, enlarged, or contact-printed, but your options may be reduced with under- or over-exposed plates. And, last but certainly not least, you can celebrate the uniqueness of handcrafted art and print from border-to-border. |
|
Uneven CoatingThe most common problem I have is unevenly coated plates. The plate below was made with the last dregs of an emulsion batch. I was pretty sure there wasn't enough to cover a whole 5"x7" plate, but I wasn't about to throw away perfectly good emulsion. Sure enough — and no problem. While I was loading the dry plate into a holder, I noted the emulsion pattern (you can load color-blind and orthochromatic plates under a safelight, so there's never a doubt about the condition of a plate's coating). Then, I drew a 'map' of the pattern on a 'Post-it' and stuck that to the outside of the dark slide. When it came time to expose the plate, I composed the scene to match the emulsion. Remember, what you see through the ground glass is upside down, so orient the plate accordingly. |
 |
 |
|
This is a very dense plate. For the purposes of this illustration I scanned it inside its ClearBag sleeve, with the printable image area drawn on the bag. Above: An Ilford Multigrade enlargement from the good part of the 5"x7" plate. |
|
 |
On the
left is a detail crop from that print. Although the
negative was dense and almost certainly overexposed, it was clean (i.e. unfogged) with good separation of values that printed very easily.
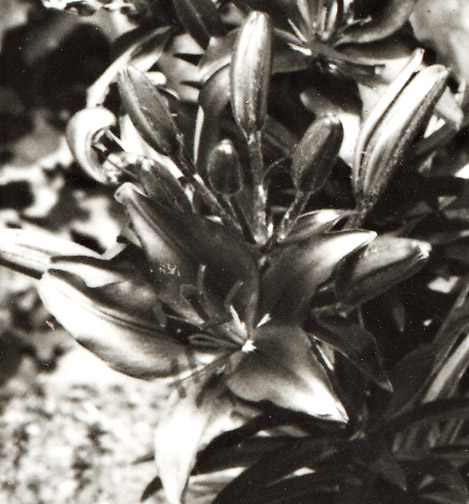
This is TLF 1 emulsion. Although it was a bright day, I exposed
for 4 sec at f/16. A jpeg of a scan of a print, viewed on a screen, doesn't do justice to the image quality. The emulsion is essentially grain-free and has the luminance characteristic of silver-rich emulsions. Note that the lilies were actually a bright yellow, a color the emulsion doesn't 'see' in bright, mid-day light (high UV). There is more about this in the next section. |
 |
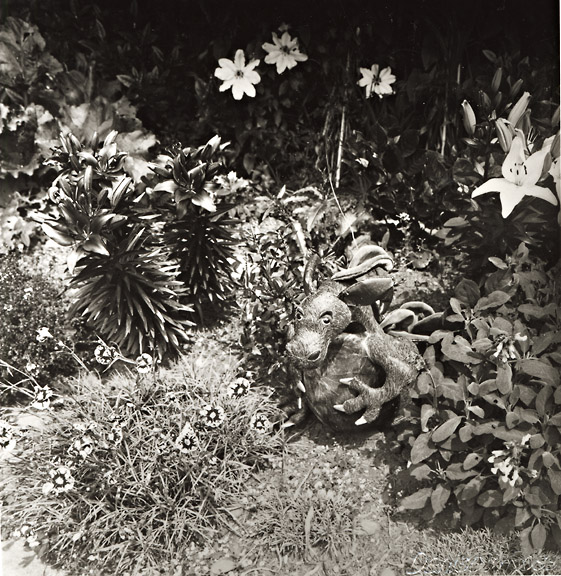
Sub-par Emulsion QualityThis 4"x5" plate was made with TLF 2; a batch that was particularly fast, but a bit fogged. The plate was exposed on a bright overcast July at 5pm, facing east, and Pancho was facing the light. 1 sec at f/22. Six minute development in D-19, a contrast-increasing film developer. The plate is too dense and flat to be flatbed-scanned, but it enlarged beautifully. The image to the left is a flatbed scan of an Ilford Multigrade print (6x8 inches) developed in Agfa 108 high-contrast paper developer. Below is another look at the difference between TLF 1 and TLF 2. On the left is a crop from this print and next to it is another crop from 'Pancho and Herman' (same % enlargement). TLF 1 is essentially grain-free.
|
 |
 |
|
The plate below is thin and flat. I knew the emulsion was fogged, but I decided to try out an exposure/developer combo that I hoped would give it a boost. Nope. Even at the highest contrast setting on my Zone VI enlarger, I couldn't get a decent print on Multigrade. Yet, it scanned beautifully. The only Photoshop manipulations were the 'burn' (shadows) and 'dodge' (highlights) tools. There's a lesson here: I almost threw out this plate — twice! — and it's now one of my favorite images. |
 |
 |
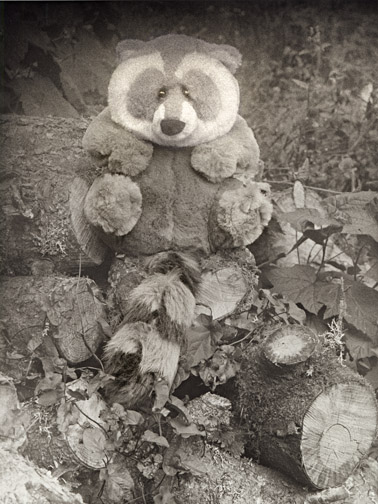
'Puff Picking Daisies' |
| I have no idea why this emulsion turned out so badly. C'est l'emulsion! Fortunately, another plate from the same batch, exposed just a half hour after this one, developed beautifully in D-19. (Rosie's Place shown on this page, between the recipes.) I hope I find that any emulsion can be 'rescued' with the right developer. |
| Back to 'Dry Plate Photography Index' | Previous | Next |
Copyright © The Light Farm |