PROCESSING 35mm or 120
In the beginning, the only equipment I had to process roll film was a medium-sized tank
and a few reels. I wanted the ability to process multiple 120 reels at once. I bought one
tank and reel from Ebay but could not seem to get what I wanted from the piecemeal
auctions. I decided to buy a large lot of dirty tanks and reels for a much cheaper price.
I picked out what was needed, resold the rest and ended up making a small profit. This
tactic works better if you have more time than money!
I spent a few days going through the local discount and hardware stores looking for
measuring cups, buckets, towels, apron, funnels and gloves. I've been using the five
liter container of Ilford Rapid Fixer. The fixer is tough to pour, so I use a turkey baster
and squirt it into a measuring cup to avoid spills. I bought a digital thermometer, but it
has already stopped working. I had an old Delta mercury thermometer in a drawer so
I'm using that while considering the coveted Kodak type 3 thermometer on Ebay. A
bucket and ice kept at 68 degrees works well as a water bath for the tanks during
processing. For the wash aid, a cheap wide-mouth juice container easily holds both
reel sizes and clothes pins work well for film hangers. There are some new film
washers still available online, but I found an older, more well-made vacuum/gravity
washer on Ebay for under $30 with shipping.
PROCESSING LARGE FORMAT
There are a number of ways to process sheet film. I had used a Jobo in school, but did
not want to deal with the space, upkeep, and cost of that. I decided to try tray
processing since it only requires trays and chemicals. I am still a bit awkward with it,
but six 5x7 trays work great for 4x5 (I have more to say about trays in the printing
section). I bought a shallow plastic automotive tray approximately 16x24 that I found at
the 99¢ store and it lays over the sink in my bathroom when I'm processing. I have an
old Gra-Lab timer with the big luminous dial and I block the light from the side near the
trays. The drawback of this method is that the temperature of the chemistry cannot be
regulated during processing, since I am in complete darkness. My usual approach is to
cool my developer in a refrigerator and then maintain that temperature during
processing by partially submerging the tank in a water bath. Having bigger sinks and a
circulating water bath is not feasible, so I am still figuring this part out. I haven't
necessarily been unhappy with my negatives, but ultimately I want more precision. The
"drift" method has been suggested to me, but I haven't experimented with that yet.
Sheet film hangers from Ebay and a cheap plastic container serve as my film washer
and clothes pins on a line in my shower serve as clips while my film dries.
MIXING CHEMISTRY
Thus far, I have been using Ilford and Kodak products for my chemistry with the
exception of hypo-clearing agent. I purchased a small digital scale and weight for
calibration from Amazon to weigh those chemicals and follow the directions from
unblinkingeye.com. I have bought buckets, funnels, spoons, etc for the different
chemicals I mix and keep everything properly marked and sequestered. On a side note,
I find automotive funnels the most useful.
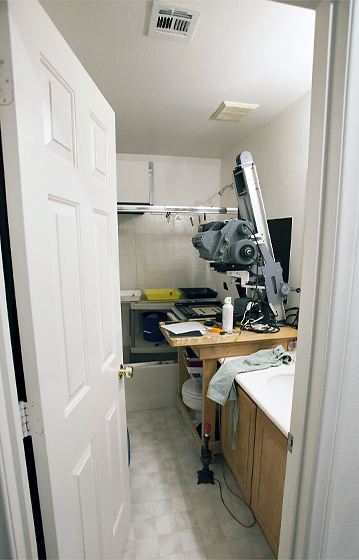
 ENLARGER
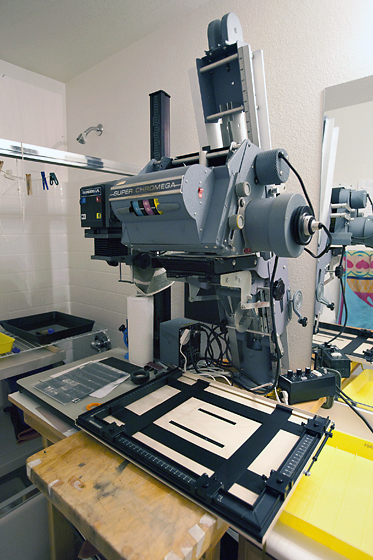
I had a Saunders/LPL 670 DXL dichroic* enlarger packed away with a good Nikon
enlarging lens for medium format. Unfortunately I previously sold all of the film carriers
and had to repurchase one for my medium format 6x7 negatives. At one time I had a
universal glass carrier and super sharp Rodenstock lens for this enlarger. Oh, how I
wish I had not sold these two items now! I bought the film carrier as "new" old stock
from a company in Canada. Items specific to a brand and model of enlarger are more
difficult to locate and sometimes more expensive.
I knew I wanted to shoot large format so I started looking for a 4x5 enlarger with a color
head. This is probably the item I have had the most difficulty acquiring. The few
enlargers capable of printing large format with a color head on ebay are usually too big
and heavy to ship with sellers advertising local pick-up only. I had been checking
Craig's List fairly regularly and did my best to put the word out to photographer friends
that I was looking for an enlarger. After about eight or nine months of looking, I was
talking to a fellow participant at our local First Friday art event in Las Vegas. During the
conversation, I found out that at one time he ran a commercial darkroom and had
several enlargers packed away. Jackpot! I bought a SuperChromega D4 from him for
a few hundred dollars.
I cleaned it up a bit, did some research on what lamps to use and set it up. It is an old
behemoth (it barely fits in my small space), and the fan is noisy, but the design is very
clever and I do not have light leaks all over the place like I do with my more modern
Saunders. The quality of the light is very nice. I can enlarge any format with this
enlarger and it came with carriers to cover most sizes. I really like my Saunders, so I
will probably use this enlarger for 4x5 and 35mm. I do not really shoot 35mm, but I
have a mountain of old negs that I would like to go through. The lenses that came with
this enlarger are ok, but I am currently looking for sharper lenses. I have made some
bids on Ebay, but have not acquired what I want yet.
Previously, I had several timers and sold all but one. Luckily, it is good digital timer, but
eventually I want to get a timer for each enlarger. If I want to use one enlarger for paper
flashing I have to switch out power cords, which is inconvenient. I also sold all of my
safelights, but had a cheap safelight jr, which is just a red light bulb. It works fine with a
household lamp minus the shade. I have had no problems with paper fogging.
*I highly recommend an enlarger with a dichroic (color) head to anyone thinking of
starting a darkroom. The color head is made for printing color photos, but it can also be
used to control contrast in black and white printing. The control of contrast with a color
head can be fine tuned to a far greater degree than with black and white contrast filters.
I would also recommend buying an enlarger capable of printing negatives from the
largest format you think you are interested in.
 PRINTING
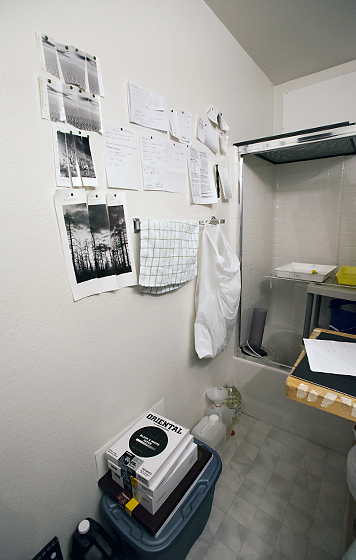
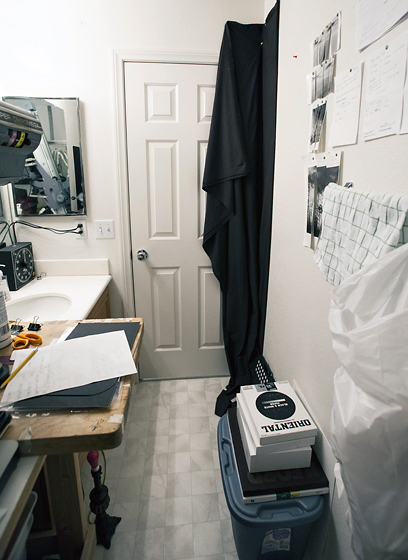
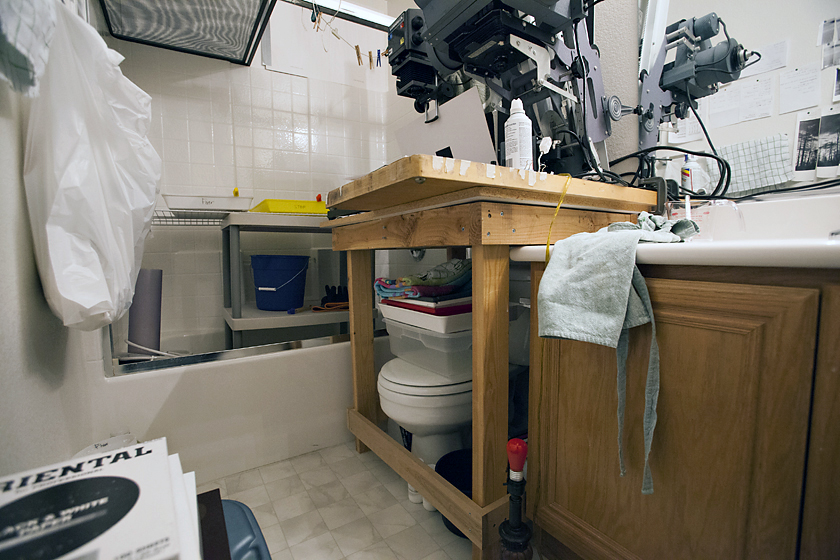
The bathroom I use is small with limited surface area, so my husband made me a table
that fits over the toilet. The table holds both of my enlargers with additional space
underneath for storage. Originally, I had my printing trays set up around my sink, but
could not fit three 11x14 trays there. I bought a plastic table that fits in the tub/shower
area and put a 6 foot metal closet rack over it to increase the surface area. To counter
the slope of the bathtub and to level the rack, I cut off a section of 1x1 wood and wired it
beneath the rack and on top of the lower sloping end of the table. The closet rack on
the table allows me to fit up to three 16x20 trays in this area and then use the sink area
to evaluate and rinse prints. The table also has a storage area underneath where I
keep buckets and other assorted equipment.
The Beseler 11x14, four-bladed easel that was in the corner of the closet for several
years has finally been put to use. It weighs a lot and was quite expensive. I never
could sell it locally and it was too heavy and bulky to sell on Ebay. One large easel is
much more useful than having multiple easels of different sizes stacked up in your
darkroom.
A grain focuser is an important item and I found a decent one on ebay. There are a lot
of them around both new and used. I suspect that I will be buying a more powerful
focuser with a wider field of view for slow sheet films, something I should have taken
into consideration sooner.
Trays, tongs, containers, measuring cups and funnels all had to be repurchased.
Buying different sized trays can be a big expense. I have found that buying printing
trays in three packs from B and H is the best way to go. There are used groupings on
ebay, but the trays look dirty and who knows what chemicals were in them. The sellers
are usually asking more than what they cost new anyway. For larger 16x20 trays I took
my measuring tape and tried to find cheap alternatives. So far, I have not found
anything cheaper with the right dimensions. The closest were concrete mixing trays at
Home Depot. They cost about $5 to $7 but they fall short on the 16" side. Thus far, I
have not purchased the 16x20 trays. When I feel like I have work warranting that size, I
will buy them. I still carry my measuring tape with me just in case I find something that
might work. I had a Kodak tray siphon and I use it clipped on the side of a plastic
container to wash rc prints and fiber prints that I am evaluating.
The other items I use for printing are things most people have in their homes. I like to
have on hand an anti-static brush, canned air, pencils, paper, scissors, tape, cardboard,
and wire. I also took a piece of glass out of an old picture frame to make contact
sheets.
TONING
Toning prints made me nervous after reading about the dangers of the chemicals and
the noxious fumes. My only previous experience with toning was the two bath sepia
process used mostly with rc paper. I started with selenium toning out in my garage and
have been experimenting more recently with polysulfide toning. I have a table and pair
of shoes I keep in the garage that I use only for toning and I do my best to follow all of
the safety directions involved. Especially with the selenium toner, I wear gloves and
have my arms covered while using it. I wear glasses so I do not bother with extra eye
protection. Each toner has a tray, tongs, funnel, and container set aside for use with
that toner only. A fan is kept running near my work area and the garage door is kept at
least partly open. For convenience a hose with a spray nozzle is set up in the driveway
for print rinsing.
FIBER PAPER WASHING
My husband had been after me to do something with the 16x20 print washer collecting
dust in our garage for about ten years. I am finally using it and grateful that I did not sell
it. I bought a hose and adapter from the hardware store and I set the washer up in a
bathtub. I use a tray with photo-flo and distilled water to soak the prints in after they are
washed and then use a squeegee to dry them. I have not printed 16x20 at this point, so
I only use it when I have many prints to wash. What I am now looking around for is a
smaller washer to use when I am making smaller prints.
POST-PRODUCTION
I had not worked much with fiber paper when I had my original darkroom. At that time, I
was a student and used rc paper for school projects. An unforeseen obstacle was the
problem with incredibly curly, stubborn fiber prints that are nearly impossible to dry flat.
I have drying screens, but I only use those for prints that I am evaluating and not prints
that have been thoroughly washed. Ferrotype dryers are available on Ebay, but most of
them are 11x14 and I wanted something larger. I read about this process of using
cardboard and fabric interfacing between prints with weight on top, similar to blotter
books. I did not find the method to be satisfactory in a desert environment and it took
days for the prints to dry. Right now I dry my washed prints between the interfacing
without added weight on top. This method appears to allow the paper to dry more
evenly with less curl.
 Ultimately, I just started looking around for an old heat press. I checked on ebay and
there are some good buys there for presses but I was not proactive enough to win an
auction. I finally found an old Seal 500T press on Craig's List for a few hundred dollars.
The seller and I somehow managed to get it in the trunk of my Honda. It is another
behemoth item that barely fits on the workbench I have annexed from my husband in
our garage. It still works great and gets my prints pressed out flat (although the Ilford
papers still stubbornly curl a bit). The platen has a few scratches and gook, but I have
managed to work around that with a few layers of silicone paper. It needs a new pad,
so instead of buying one I have built it up with carpet underlay and some mat boards. I
have not actually done any dry mounting with it yet because I am still undecided about
that process.
Ultimately, I just started looking around for an old heat press. I checked on ebay and
there are some good buys there for presses but I was not proactive enough to win an
auction. I finally found an old Seal 500T press on Craig's List for a few hundred dollars.
The seller and I somehow managed to get it in the trunk of my Honda. It is another
behemoth item that barely fits on the workbench I have annexed from my husband in
our garage. It still works great and gets my prints pressed out flat (although the Ilford
papers still stubbornly curl a bit). The platen has a few scratches and gook, but I have
managed to work around that with a few layers of silicone paper. It needs a new pad,
so instead of buying one I have built it up with carpet underlay and some mat boards. I
have not actually done any dry mounting with it yet because I am still undecided about
that process.
The spotting pens I bought many years ago still work well and are not dried out. I like to
use them on glossy paper, but prefer colored pencils for matte paper. I printed out a
50% off coupon from Michael's craft store to purchase a tin of Prismacolor pencils. I
had a huge set of Marshall's oils and pencils, but of course sold those on Craig's List a
few years ago. I found a set of Marshall's oils selling at a good price from Adorama.
Online sources claim that any oils can be used, but I haven't experimented much with
that yet.
OUTCOME
When I started this process I thought it would be relatively easy. I consider myself to be
a decently accomplished photographer. The truth is, I forgot how difficult photography is
without a screen for instant gratification and photoshop to remove problems and quickly
enhance any image. I forgot that the equipment is heavy. I forgot that a roll of film has
one ISO. I forgot that I cannot remove unwanted objects from a scene. I forgot about
film processing and proofing.
Putting together a darkroom is the easy part. Making a good image takes time, skill,
and patience. I have only stepped out of my darkroom a few times in this last year
feeling like I made a good image. My obsessive nature keeps sending me back in to
keep working. The experience has been humbling, but it has also brought me a feeling
of accomplishment. I have come so far, but I still have a long way to go. Isn't that the
point?
www.wendymonahan.com
| 
 My information sources to research and relearn have mainly been books and the
internet. Unfortunately, the local camera store only carries overpriced old film
equipment and a few packages of Kodak chemistry and none of the sales staff there
seem to care or know anything about traditional photography. Online organizations with
social forums such as APUG and other photography websites have been very helpful.
There are many strong opinions on forums and erroneous information everywhere, but I
find that reading over differing opinions and researching varying processing styles gives
me a starting point that I could never get anywhere else. YouTube is another great
source for information and how-to videos. I learned how to tray process large format
sheet film by watching Tom Johnston Photography's YouTube videos. Tom is very
generous and will share his knowledge and experience freely to anyone interested in
learning (Tom Johnston photography on YouTube). He has really helped me understand
exposure and the processing of black and white film and I am so grateful to him.
My information sources to research and relearn have mainly been books and the
internet. Unfortunately, the local camera store only carries overpriced old film
equipment and a few packages of Kodak chemistry and none of the sales staff there
seem to care or know anything about traditional photography. Online organizations with
social forums such as APUG and other photography websites have been very helpful.
There are many strong opinions on forums and erroneous information everywhere, but I
find that reading over differing opinions and researching varying processing styles gives
me a starting point that I could never get anywhere else. YouTube is another great
source for information and how-to videos. I learned how to tray process large format
sheet film by watching Tom Johnston Photography's YouTube videos. Tom is very
generous and will share his knowledge and experience freely to anyone interested in
learning (Tom Johnston photography on YouTube). He has really helped me understand
exposure and the processing of black and white film and I am so grateful to him.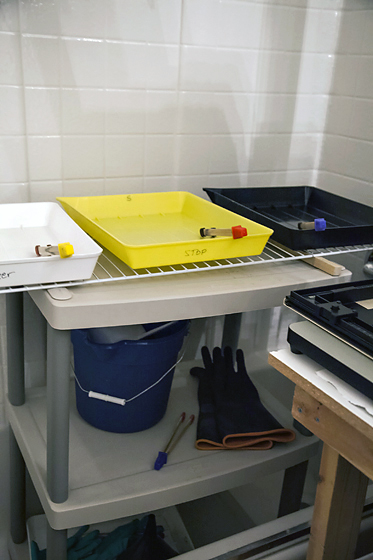 When buying photographic equipment I usually research an item online first. When I
have not done this and taken a seller at their word, or worse let my romantic notions of
the item's value affect my judgement, I have usually regretted it. I first look at the item's
price new (if possible), and used. If the new item is rated by other buyers, such as on
Amazon or B&H, I read through those. I also do a general search of the item to see
what information is available, and specifically do searches in online forums to read what
other photographers have to say. I try to decide if I really NEED the item, and if so,
what future uses it might have.
When buying photographic equipment I usually research an item online first. When I
have not done this and taken a seller at their word, or worse let my romantic notions of
the item's value affect my judgement, I have usually regretted it. I first look at the item's
price new (if possible), and used. If the new item is rated by other buyers, such as on
Amazon or B&H, I read through those. I also do a general search of the item to see
what information is available, and specifically do searches in online forums to read what
other photographers have to say. I try to decide if I really NEED the item, and if so,
what future uses it might have.