8. KCl Gaslight Paper—Background |


|
|
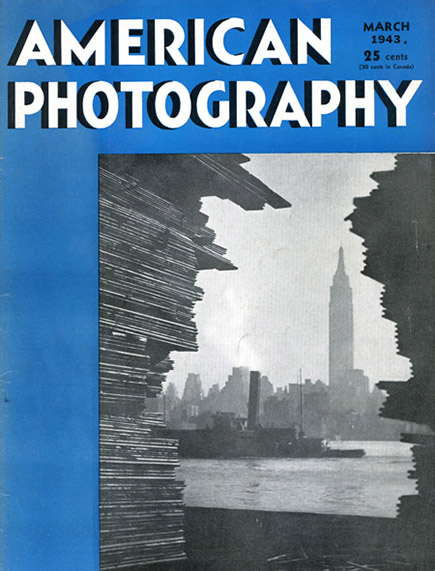
OK. We're ready to go. All the prep work that can realistically take place—before you actually get your hands into things — is done. From now on it will be a spiral of progress. Learn one thing. Change one thing. Learn a new thing. Screw up. Never make THAT mistake again! Success! Learn another new thing... We're starting with one of my favorite photography authors: T. Thorne Baker. I can't find out as much as I'd like about Mr. Baker. He was British. He was a photographer who practiced his craft for at least 50 years. He wrote extensively on a number of areas of science/technology. He wrote clearly, but with a subtle poetic cadence. He had a sense of humor. I think he was a BBC science editor. I keep waiting for someone to build him a Wikipedia page, but so far it hasn't happened. On my bucket list is to spend enough time in the UK to thoroughly research his life and maybe write that Wiki page. Our first recipe comes from a photography magazine —American Photography, 1943. |
|
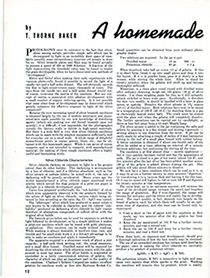
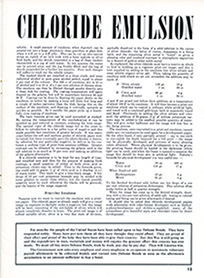
Below is the article in its entirety. It is actually two recipes—both developing out paper and printing out paper. If you're interested in a little vocabulary and chemistry, read through the article followed by my annotations. If not, skip down to the short form recipe. The next lesson page will cover the expanded version of the recipe, with instructions in excruciating detail along with a video, but for now note that the recipe has only five ingredients plus water. Start to finish, you can have paper drying in your darkroom in an hour and a half. |
|
|
|
|
|
|
ANNOTATION The Scheiner scale for measuring an emulsion's sensitivity to light (i.e., speed) was one of many that proliferated before the industry settled on ASA/ISO. It was already almost obsolete in 1943, and Baker undoubtedly knew that, and knew that his audience knew. The Scheiner scale was logarithmic, much like the Richter Scale for earthquakes. One unit increase is much more than adding one. The charts of the day only went as high as 41 Scheiner, equivalent to about ASA 800, so "100 or 1000" was Baker's way of saying (and this is my interpretation), "the sky's the limit for photography." And he was right. Halides for our purposes are chloride, bromide, and iodide—the elements that can combine with silver to make magic. Units of Measurement: a "cc" (cubic centimeter) is equivalent to a "ml" (milliliter). When measuring water, they are both equivalent to 1 "g" (gram). A "g" is not the same as a "gr" (grain). A grain is 64.8 milligrams. If a recipe uses grains as its weight unit, it usually also uses ounces for liquid measurement. Even the very old recipes use the gr/oz system alongside the g/ml system. From the very beginning, people have relied on conversion tables. They used to be paper. Today, the internet makes precise conversions effortless. Google "grain to gram." Mazda lamp: The registered trademark name of incandescent light bulbs once made by General Electric. By the time this recipe was written, gaslight had been replaced with electricity. Pure chloride papers were still called "gaslight" papers, but name no longer followed function. I haven't tested this recipe with a 15 watt white light bulb, but if this is the only recipe you're ever going to make, a low-watt yellow "bug" bulb works fine. It is also the light of choice when making gum prints. If you end up making silvergum prints with chloride paper, a yellow bulb is the only safelight you will need. Ag: The chemical abbreviation for silver. It comes from the Latin argentum. Chemicals have different names in different languages. Silver is Silber in German and Argent in French. Universally recognized symbols, based by and large on Latin, are the common language of chemistry. The first letter is always capitalized, the second letter is always lower case, and there are only one or two letters. That is the way you can tell a compound from an element (and it's as easy to remember which is which as it seems.) AgNO3 indicates a compound made up of silver, nitrogen, and oxygen. For our purposes today, the "3" isn't important. K is potassium, because the K is from kalium. (Phosphorus took the P.) Br is bromide. Potassium bromide in German is Bromkalium. The universal language of chemistry helps keep it all straight. Edit, 1/25/13, with thanks to Henk Mantel, who lives in Germany, for his information on modern usage: I got the term "bromkalium" from Photographie mit Bromsiber-Gelatine, 1890, written by the great German emulsion chemist, Josef Maria Eder. Also, Dictionary of Photography, 1912, by E. J. Wall, uses that term. Henk tells me that in the last one hundred years, times have changed. Surprise! Today, "bromkalium" sounds more like something you'd use as a medicine. When ordering for photography, look for "Kalium Bromid." AgNO3 + KCl = AgCl + KNO3: This is the archetype for emulsion formulas. It simply means that AgNO3 (a.k.a. silver nitrate) plus KCl (potassium chloride, a salt)—when dissolved in water — recombine to make AgCl (silver chloride) and KNO3 (potassium nitrate.) Neat! Silver chloride is, of course, the magic that this is all about. |
|
|
|
RECIPE: "A homemade CHLORIDE EMULSION", Pyrex Measuring Cup and Whisk Method—Short Form |
|
Salted Gelatin In the 1-cup Pyrex cup, dissolve together
When dissolved, slowly and thoroughly stir in
Bloom the salted gelatin and then set it in a preheated 49–51°C waterbath until the gelatin reaches waterbath temperature. Silver solution In the meantime, dissolve together
GO TO SAFELIGHT. With constant, consistent whisking, add the silver solution to the salted gelatin in three x one minute intervals. Whisk for a total of 5 minutes. Cover the emulsion with plastic wrap and set the stacked Pyrex cups in a pot with a tight, lightproof lid. Pour in enough almost boiling water to cover half the 2-cup Pyrex (or have hot water ready in the pot). Cover the pot and prep for coating while the emulsion is ripening (approximately 30 minutes). If you know your pot is lightproof, you can do the paper prep in white light. Cool the emulsion to coating temperature (approximately 40°C). You can speed cooling by very gently and slowly stirring the emulsion with a clean plastic spoon while watching the temperature with a thermometer. Coat. (~ 50–55 ml/ < ¼ cup emulsion per 11"x 15" sheet of paper, coated with a 9" puddle pusher.) Hold the emulsion in a coating temperature waterbath between coating the individual sheets of paper. [October 2018 update: Wet paper coating with emulsion guide bars moves along so quickly that unless your darkroom is cold, it is seldom necessary to hold the emulsion in a coating temperature waterbath during coating.] Dry the sheets in the dark. Store the dry paper in lightproof conditions. Do not expose a sheet of paper to room light until it has been thoroughly fixed out. |
|
|