Bits & Pieces


 Site Index 

Emulsion 1A Developing-Out Contact Printing Paper

This image will be a standard test for all the new emulsions I make.  It is a 4x5 inch dry plate from the 1940s, and was sleeved with the thin test strip on the right, labeled simply 'Azo'.  Beyond it being a single-weight paper and glossy, I don't know the type of Azo or the developer that was used.  Still, I love the image and the fact that it comes with a 60-year old test strip to compare to.  The strip on left is 'Emulsion 1A', coated on Fabriano HP, X-white, developed in 'Defender 55 Dwr' (here). Except for the color, the differences between the strips are almost entirely due to paper texture.  '1A' may record more in the highlights and a bit less in the shadows than the Azo.

Notes and conclusions here:

Emulsion 1A Developing-Out Contact Printing Paper

PART ONE:

Preheat waterbath on a stirring hot plate1 to 60°C. (Water level at 2 inches.) Illustration

Unless otherwise specified, solutions are assumed to be at room temperature. Chemicals and equipment not otherwise sourced can be purchased from Photographers’ Formulary2 or your neighborhood household goods/hardware store.

Gelatin A:
13 g Photographers’ Formulary gelatin (250 Bloom) in
65 ml refrigerator temp distilled water. Bloom at room temperature 1 hour in 400 ml beaker.

Gelatin B: Same as A.

Salts:
4 g Masu seawater salt3 dissolved in
20 ml distilled water.
0.5 g KCl (Potassium chloride).
2 g citric acid.
0.7 g NH4Br (Ammonium bromide).
5 ml Everclear alcohol4.

Silver:
5.6 g AgNO3 dissolved in
25 ml distilled water.

  1. Pour silver solution into closed 25 ml stopcock buret5 (stand6 and clamp7). Illustration
  2. Melt Gelatin A to 40°C in 60°C waterbath, stirring gently with a clean plastic spoon.
  3. Add a magnetic stirring bar and start a vigorous vortex in the center of the beaker.
  4. Add the salts in the order listed, stirring to dissolve after each addition.
  5. When the temperature of the salted gelatin reaches 50°C go to red darkroom safelight illumination8 and position the buret over the gelatin.
  6. Turn off the heat on the hot plate.
  7. Set a darkroom timer for 10 minutes.
  8. Open the buret (contents should empty in 45-60 seconds.)
  9. Continue stirring for 4 minutes, then slowly add Gelatin B, mixing it in with the help of a plastic spoon.
  10. Finish out the ten minutes with the magnetic stirring bar.
  11. Remove the beaker from the waterbath. Wipe off the water with a clean towel.
  12. Slowly pour the emulsion through a stacked set of cone-shaped gold mesh coffee filters (3 to 5), set in a funnel over a clean 400 ml beaker.
  13. When the emulsion has filtered through, divide into two pint-size canning jars.
  14. Cover each jar with a piece of plastic wrap secured by the canning lid band or a tight rubber band. (Don’t allow metal to come in contact with the emulsion.)
  15. Set each jar in its own light-tight container in an inch or two of ice water.
  16. Secure container lids and place in refrigerator for at least 8 hours, but not more than one week.

PART TWO:

Preheat waterbath on stirring hot plate to 50°C.

Remove one light-tight container from refrigerator. Place on a coffee mug heater, or similar (~60°C) for one hour.

Go to red safelight.

  1. Open the container and place the canning jar of emulsion (remove plastic wrap) in the preheated waterbath with a thermometer.
  2. Stirring gently with a plastic spoon, melt the emulsion and bring it to 40°C.
  3. Pull the canning jar out to the waterbath and pour the emulsion through a gold mesh coffee filter into a 250 or 400 ml beaker. Drop in a stirring bar.
  4. Place the beaker in the waterbath and start slow magnetic stirring.
  5. For dry paper coating, add 10 ml room temperature distilled water.
  6. Bring the temperature of the emulsion up to 45°C.
  7. Set a darkroom timer for 5 minutes.
  8. Add 12 drops 1% KI solution. Stir 2 minutes.
  9. Add 12 drops Photoflo 600 (or Daniel Smith Acrylic Flow Releaser9, diluted 2:1 with water, or to best effect).
  10. Add 10 drops glyoxal.
  11. Continue stirring for the remainder of the 5 minutes.
  12. Strain through a gold mesh coffee filter.

Cool to coating temperature and coat paper as usual. here


I will be using this step tablet and 40-year old printed circuit board registration target for all my subsequent tests.  '1A', developed in 'Def55Dwr', gives twelve distinct density steps.  A curve of this would have a sharp toe, a fairly steep mid-section and a shallow shoulder.  This emulsion is at its best in the highlights.

The image to the left of the tablet is a crop from the registration target : 1 mil to 8 mil black bars (1 mil = 1/1000 inch = 0.0254 mm).

And, finally, the b&w base for a silvergum print (inkjet negative from digital camera file.)  The emulsion did a beautiful job of preserving the subtle density differences in the fuschia flowers.


Notes and Conclusions:

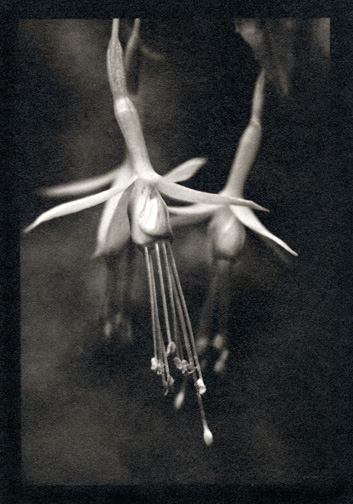
1) 10 drops glyoxal wasn't enough hardener for plain hypo fix.  The print surface developed small bubbles before the end of a sufficient wash time.  Changing to a two-bath fix before washing, making the second bath a hardening fixer, solved that problem.  This is only a solution, though, if there is no plan to tone the prints.  I'll put 15 drops glyoxal in '1B'

(Note: See the next page.  Adding more glyoxal did not change the bubbling problem.)

2) This make didn't employ a syringe and subsurface silver addition.  There is very slight microscopic peppering, but not enough to support the assertion that subsurface addition is a necessary technique. 

3) The untoned color of the emulsion is a lovely neutral without a hint of green, influenced, I believe, by the amount of citric acid.

April 4, 2010. Material Info Update - Fabriano Artistico papers:  After a number of months of testing, I am convinced that Fab Art paper has been changed.  I started out with Fab Art X-white HP paper four years ago and have coated just about every variety of emulsion imaginable on it.  As ugly as some emulsions have been, one thing I felt confident in saying was that they were bullet-proof — no bubbling, frilling or lifting.  That changed about four months ago.  I started getting tiny bubbles of lifting emulsion during washing.  I originally thought that one of my ingredients had gone old, but after replacing all of them, one by one, I did a whole range of paper samples again.  With any given run of emulsion, only the Fabriano Artistico papers develop bubbles.  I love Fab Art paper, so I pushed through for a work-around solution.  Bubbles are eliminated, or at the least greatly reduced if I use hardening fixer and follow with a 'speed wash' protocol (short pre-wash, archival washing aid, shortened final wash, squeegee, dry).


Copyright © The Light Farm