Enlargement of 5"x7" plate on Ilford Multigrade FB
Dry Plate PhotographyThe Light Farm Negative Emulsion Recipe #2 |
|
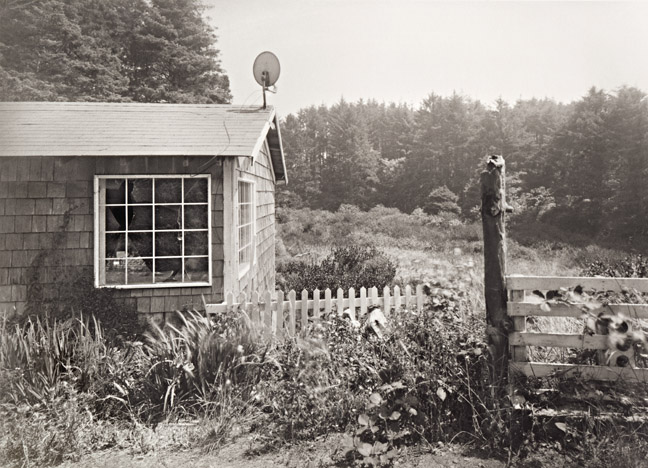
| 'Rosie's Place' |
|
TLF #2 Negative Emulsion Enlargement of 5"x7" plate on Ilford Multigrade FB |
|
August 5, 2012
'TLF #2' is now updated. 'TLF#2, 2nd ed.' Negative Emulsion — Pep Talk 'TLF#2, 2nd ed.' Negative Emulsion — The Basics 'TLF#2, 2nd ed.' Negative Emulsion — The Recipe |
|
1st Edition Commentary: I haven’t done as much work with TLF#2 as with TLF#1, although both 'Sunbow Over the Bayfront' (the image heading Section 7) and 'Rosie's Place' were made with the following recipe. It is considerably faster than TLF#1 emulsion. It is also prone to grain and fog, but I’m looking forward to learning its full potential. I know I liked being able to catch the seagull in 'Sunbow...' (The plate was shot at 1 sec and f/32. I seriously overestimated the required exposure. A second plate shot at 1/2 sec was better, but still a little dense, except the seagull lost patience with me. At 1 sec and f/32, the plate is so dense it looks almost black on a light table, but it still produces a decent enlargement. More work with this recipe is coming soon. |
Full-Ammonia Bromide Emulsion Formula ("TLF #2, 1st edition")(For an updated 2nd edition version of this recipe, please see the links from the glass-green box above) |
|||||||||||||||||||||||||||||||||||||
|
1) Preheat a waterbath jacket on a magnetic hot plate to 45C. 2) Hold a waterbath pan at 40°C on a temperature-controlled hot plate. 3) Weigh out all chemicals.
Procedure: Allow gelatin to soak in cold water 30 min; place in 40C waterbath, then stir while warming to 40C to dissolve. Add KBr and KI solution. Cover and leave sitting in the waterbath. Watch the temperature.
Procedure: Add the ammonium hydroxide slowly with stirring until the brownish-black silver hydroxide precipitate that forms has just re-dissolved. Avoid excess ammonia. (*After 5ml, add the ammonia by the drop, stirring thoroughly after each addition, until the solution clears.)
Precipitation, emulsification and first/physical ripening:Procedure: Under safelight. Stir Part I rapidly* and with a syringe add half (10 ml) of Part II near the bottom of the beaker. Ripen 45 minutes at 45C, stirring for 30 seconds after 15 minutes and again 15 minutes later. (Procedure for Part III gelatin: Right after the second stirring, pour the cold water over the gelatin.) Then, stirring rapidly, with a syringe add the rest of Part II to Part I. Stir 30 seconds and then add 2 drops 1% KI. Stir for one minute. Pour this mixture over Part III and place the beaker in the waterbath. Warm to 45C with gentle stirring, then ripen 15 minutes. Pour into a ziploc sandwich baggie set in ice water in a lightproof container. Store overnight to a week under refrigeration.
Preheat magnetic hot plate to 40C. Under safelight: Noodle the cold emulsion. Wash in ice water with twelve x 5 minutes each, water exchanges. While the noodles are still in the jelly bag, after the last washing use the rinsed out potato ricer to squeeze out as much water as possible. Then, roll the bag in a clean, dry terry towel and knead for a minute to get out more water. Open the jelly bag and turn the noodles out into a cold, stainless steel, lightproof container. (A 16oz film developing tank works great.) Sprinkle 7g dry gelatin over the top of the noodles and gently stir. Don’t worry about completely mixing it in. Store the noodles up to a week, or let rest at least 30 minutes under refrigeration, before digestion and coating. Digestion/Chemical ripening and coating:Preheat magnetic hot plate waterbath to 52C, with 250 ml beaker and stirring rod. Under safelight: Add the noodles to beaker and bring up to 40C with gentle stirring. Add 4 drops Steigmann’s gold sensitizer, stir one minute. Bring temperature up to 52C as quickly as possible without the waterbath ever overshooting 53C. (When the emulsion hits 50C, start to bring the temperature of the waterbath up to 53C. The emulsion will probably hit 52C before the waterbath hits 53C.) With stirring, add 6 ml Everclear. Strain through two nested gold mesh coffee filters into a clean beaker. Coat at 32-35C. Experience with your own workflow will determine whether you need to keep the emulsion nested in a waterbath while you coat.
Recipe modifications to try
|
|||||||||||||||||||||||||||||||||||||
|
Replace This Text in js
Replace This Text in js
|
Copyright © The Light Farm |