(Nearly) Foolproof Plate Coating
November 3, 2011By the time photography changed from collodion wet plate to gelatin dry plate, a generation of photographers had developed serious hand-pouring skills. Wet plate was, and still is, a hand-poured emulsion. The best in the profession could pour flawless plates, but even less-than-perfect plates were, and are again, valued for the idiosyncratic imperfections that show the "hand of the maker."
But gelatin emulsion is nothing like collodion. There are many differences but the difference that made all the difference in the 1880s was that for the first time negatives could be made ahead of time and carried into the field, rather than having to be made on site immediately before exposure. It's impossible to overstate the degree to which this changed photography. I get the impression from literature of the time that our digital revolution is mild in comparison.
Photographic materials production moved into factories. The first manufactured dry plates were poured, just like wet plates had been, but it didn't take long for George Eastman and his competitors to set up automated coating machines. Photographic materials production left the handcrafted sphere and became almost completely commercial. Many skills were lost, including hand pouring plates. Through the years, though, the image of pouring emulsion from a pottery pitcher persisted. Unfortunately, and as you probably can guess, hand pouring is a skill won from long experience or natural talent—neither of which I have. I tried pouring a plate. Once. What a mess and waste. I needed a different approach. When I jumped into dry plate, I was already making paper—coating with a combination of glass emulsion well and glass rod "Puddle Pusher." The system works great and is still probably the best bet for ULF plates, but for plates up to 6.5"x 8.5" (Whole Plate format) applying emulsion with a catheter syringe is much, much easier, less wasteful of emulsion, and very reliable.

- Dead flat and level coating surface in a darkroom (or dark room).
- Silicone baking mats, the rubbery kind. (Amazon.com)
- Glass plates to fit your holders (clean and ready to coat).
- Misc rectangular pieces of glass to surround the plate and create a dam to stop the emulsion from flowing away (edges smoothed enough to be safe).
- 35 or 60 ml catheter tip syringe. (Amazon.com)
Tools and Materials:
[October 2018 update: The downside of relying on any consumer product to remain available for years is that most don't! It's getting harder to source inexpensive, retail silicone sheets. Fortunately, an alternative method—easier, very inexpensive, and very likely to remain available. Use a glass coating surface (either a dedicated glass-topped table, or large individual glass sheets placed on a dead-flat surface) with kitchen plastic wrap. Lightly dampen the plastic film and then lay down the glass pieces. The glass sticks like it's on a vacuum frame, but afterwards lifts easily. An additional advantage is that less care if it's necessary to cut the pieces apart (see below).]
Surround a plate, or a line of plates, with pieces of glass. There should be an 1/8-inch gap between each plate edge and the emulsion dam strips or an adjoining plate. The perimeter of emulsion dam strips should not have gaps. You want to capture just the right amount of emulsion on each plate.
The plates can be coated, set, and dried at room temperature—no need for warming tables or chilling tables, but dead level is vital. The easiest way to level is by dribbling a tablespoon or so of water on a plate. If it forms and retains a nice round puddle that doesn't move, you've achieved dead level.
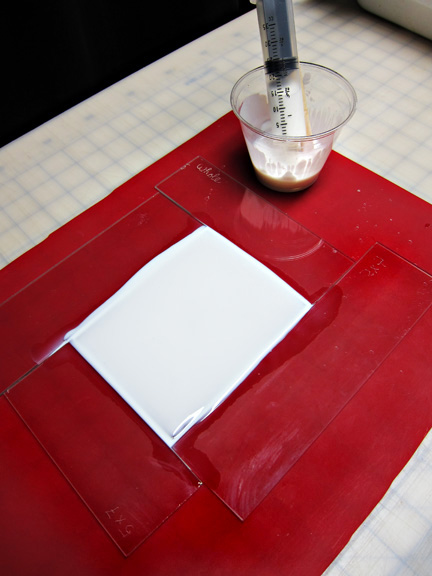
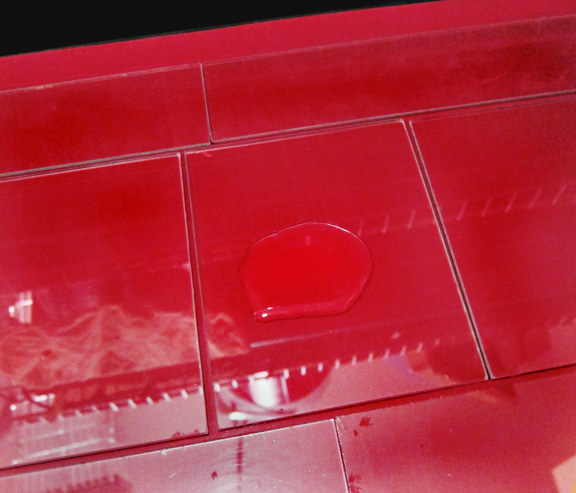
Under safelight (of course), suck up the right amount of emulsion in the syringe. Hold the syringe perpendicular to the center of the plate and slowly and evenly depress the plunger. I'm afraid practice makes perfect here. Experience is necessary to determine the variables. 1) You want to depress with enough force to spread the emulsion, but not so much that you make bubbles. 2) The amount of emulsion per plate must be determined by trial. 3) The relationship of temperature and emulsion viscosity comes into play— not too thick, not too thin. Although too thin is the more usual issue, emulsion can be too thick. There reaches a point where developer can't penetrate to the glass and fixing takes forever. Play with the amount of make-up gelatin and/or the coating temperature of the emulsion.
When the emulsion has dried, separate the plates from each other and from the dam pieces. The dried emulsion in the gap spaces will look and act like a hinge. With a sharp knife, cut along the hinge, using the dam piece as the straight edge. Be careful not to cut the silicone sheet. It's impervious to heat and sticky things, but not to sharp objects. Some emulsion will have siphoned under the plates and will still be wet. Prop the plates up so that their backs can dry. This emulsion doesn't have to be removed until exposure and all the processing is done (but before printing). Use a moistened towel, and a razor blade if necessary, taking care to not damage the front of the plate. The emulsion dam pieces are reusable. Once you get the coating right, there will be very little emulsion on them to clean off.
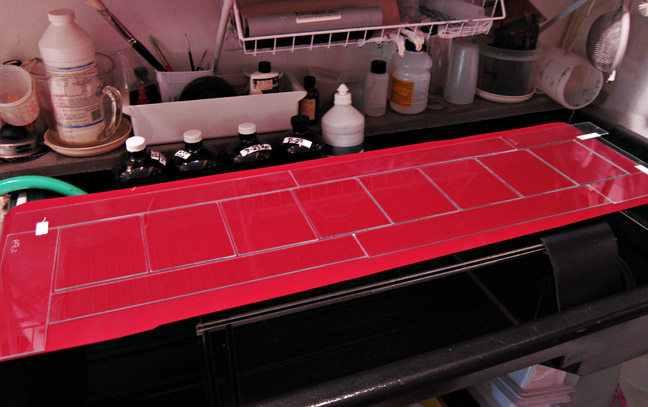
As many plates as necessary can be lined up and coated—one immediately after another. This line took less than three minutes to coat.
One last thing: the dried edges of emulsion can sometimes be a little thick. If too much so, try tweaking the way you separate the plates, or narrow the gap space between plates and dams.