Kitchen Lab Emulsions

Hershey's Tornado Emulsion


 Site Index 


The Light Farm Low Tech Emulsion #1: Hershey's Tornado Emulsion

I call this 'Chocolate ' in my notes and it just happens to be the color of dark, dark chocolate.


'Cape Perpetua Driftwood'

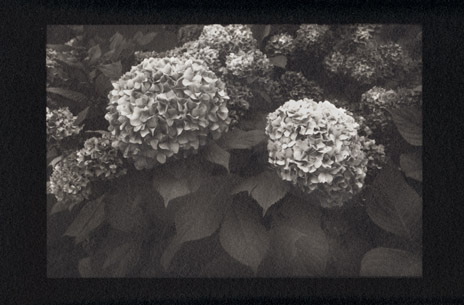
Contact print of 4"x5" Tmax 100 negative. 'Warm ', version 2, made with a Hershey's Tornado chocolate milk mixer and no specialized lab equipment beyond a good scale.


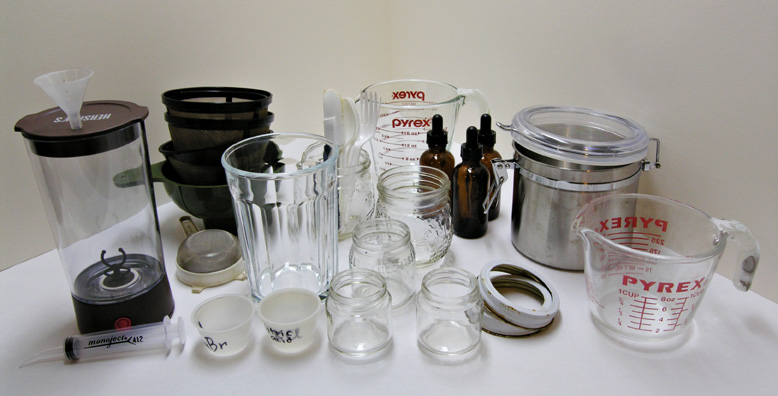
Tools and materials needed:

  • Hard bloom photographic grade gelatin.
  • Silver nitrate (AgNO3).
  • Sodium chloride (NaCl).
  • Potassium Chloride (KCl)
  • Citric acid.
  • Ammonium bromide (NH4Br)
  • Potassium iodide (KI).
  • Photoflo 600 (or Daniel Smith Acrylic Flow Reducer cut 2:1 with distilled water).
  • Glyoxal.
  • Everclear or similar (keep some in a small atomizer bottle for spritzing).
  • Distilled water (keep some in the refrigerator).
  • Scale accurate to at least 0.1 g and calibration weights.
  • 2-oz amber glass dropper bottles (3).
  • Digital thermometers (2).
  • Strainers: stainless steel tea and gold mesh coffee (2).
  • Lightproof, waterproof canisters (2).
  • Plastic spoons and forks.
  • Plastic condiment cups.
  • Plastic canning (wide mouth) funnel.
  • Small 'rubber' (plastic or silicon) scraper.
  • 10 ml and 100 ml graduated cylinders are very handy or measuring cups or syringes marked in mls.
  • Protective gloves and eyewear. Old clothes or a mad scientist coat.
  • Hershey's Chocolate Milk Tornado Mixer".
  • Small plastic funnel and an electric drill with a bit to match the funnel neck size.
  • Monoject 412 curved tip syringes
  • Crockpot.
  • Buffet warming tray, or similar, referred to as 'hot plate' in the recipe.
  • Tall French working glasses (21 oz. Luminarc) (2).
  • Canning jars, 1/2-pint size, with lid rings (6).
  • Several baby food jars.
  • Safelight (Red or amber. Note: The yellow bug light in the illustration is for gum printing.)

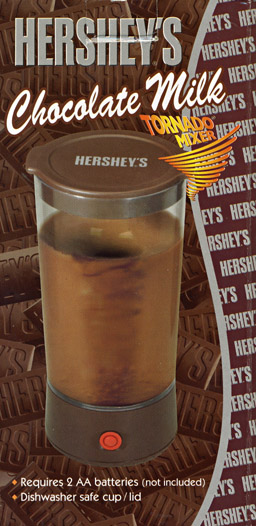
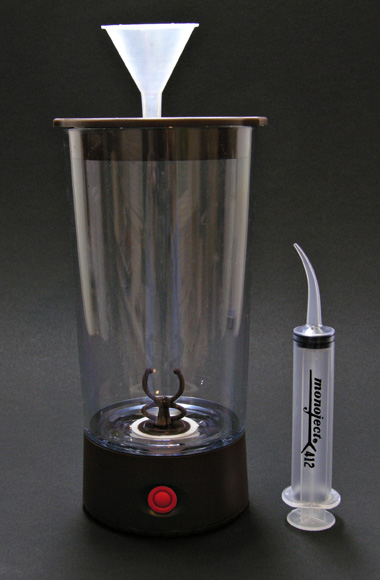
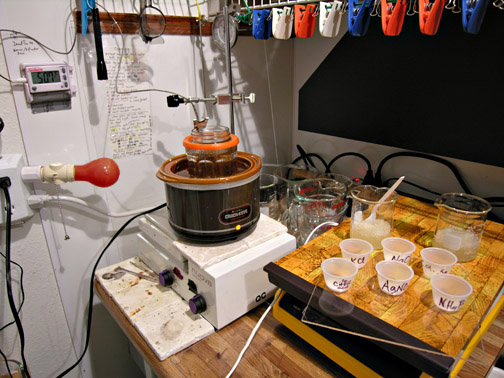
A Hershey's "Tornado" chocolate milk mixer is a nifty gadget. I bought mine locally from a grocery store Christmas display, but like all good things, it's available online (here) . There are any number of similar products. I drilled a hole in the lid for a tiny funnel. A funnel and a plastic syringe comes with a TLF Emulsion Well (here), but the funnels are available at most craft stores, and you can simply pour in the silver nitrate solution from your mixing beaker/cup.

A waterbath is easily made from a crockpot and a tall (21 oz.) French cafe/working glass (or wide mouth quart canning jar). The illustration here shows a second jar secured by the lid of the cafe glass (for smaller batches). The one glass inside the crockpot holds a remarkably stable temperature. (There's a closeup of the water bath on the following page.)

A 'Sunbeam' brand kitchen thermometer with a long, flexible probe is attached to the wall behind the waterbath. The probe runs from the wall-mount to the waterbath and is in the bath at all times. The digital readout makes it easy to keep an eye on the temperature.


This b&w print was made with the above setup. It is the first layer of the three-color silvergum print shown.

For more information about Silvergums.


The Light Farm Low Tech Emulsion #1:
Hershey's Tornado Emulsion

a.k.a. 'Warm #2'

With recipe procedure modified for making with a "Hershey's Chocolate Milk Tornado Mixer" and a minimum of formal lab equipment

Gel A: 13 g gelatin / 75 g or ml water (Tip: for water, ml is the same as g)
Bloom (swell in water) 1 hr starting with cold distilled water.
Melt to 43°C in a waterbath kept at 43-45°C.

Gel B: 13 g gelatin / 75 g (ml) water (or: 65 g if coating wet paper).
Bloom gelatin for 1 hour starting with cold distilled water.

Tip: As you assemble your equipment, do a dry run of measurements — table salt or sugar, tap water, and Knox gelatin are cheap test substitutes — to make sure the amounts required fit in your containers at each step.

Have ready:

  • Crockpot waterbath at 52-53°C. (Tip: Keep both crushed ice and very hot water close at hand to keep the temperature regulated, if need be.
  • Assembled Tornado mixer (with small funnel firmly seated in a hole in the lid half way between the edge and the center).
  • Monoject 412 syringe(s). (Tip: I pre-fill two.)
  • Baby food jars.
  • Plastic condiment cups to weigh out and hold dry chemicals.
  • Plastic spoons and forks. (Tip: Wash and rinse everything, even the plastic items straight out of the packaging. "Too clean" is impossible.)
  • 2 8-oz canning jars, plastic wrap and jar lid bands.
  • Very hot water (a quart-size glass Pyrex measuring cup is handy here)
  • Atomizer bottle of Everclear (a lens cleaner bottle, washed with detergent and rinsed once with Everclear before filling; used whenever 'spritzing' is called for.)
  • Lightproof canisters and heavy black plastic (if needed) for storing the emulsion in the refrigerator between stages.
  • Weighed chemicals:
    • 3.9 g NaCl (Sodium chloride) / 12 ml (g) water
    • 5.6 g AgNO3 (Silver nitrate) / 20 ml (g) water
    • 0.5 g citric acid / 10 ml (g) water
    • 0.5 g KCl (Potassium chloride)
    • 1.0 g citric acid, dry
    • 0.7 g NH4Br (Ammonium bromide)

Dissolve NaCl set at room temp.

Dissolve AgNO3 warm to 40°C. (Tip: at no time let silver nitrate touch your skin.)

Dissolve 0.5 g citric acid in 10 ml water warm to 40°C.

  1. Pour the hot water into the assembled Tornado and let it preheat a minute. Pour the water back into the original container.
  2. Strain melted Gel A through a tea strainer into the Tornado.
  3. Add in this order, with a whiz of the Tornado after each addition: NH4Br, 1.0 g dry citric acid, NaCl solution and KCl.
  4. Combine the warm citric acid solution and the AgNO3 solution. Suck up about 10 ml into a syringe. Hold the rest at 40°C.
  5. GO TO SAFELIGHT
  6. Touch the tip of the syringe to a clean paper towel and carefully shove the tip into the neck of the funnel in the lid of the Tornado (being careful to not depress the plunger).
  7. With one hand on the Tornado button and one hand on the syringe plunger, empty the syringe into the whirring emulsion. (Start the Tornado just before syringe and aim for about a 1 ml/second emptying rate.) This is termed the Precipitation or Emulsification step.
  8. As quickly as possible, repeat the process (either by refilling the first syringe, or using a pre-filled second. There will probably be a little silver solution still left. If so, repeat a third time with whatever is left. (It is important to use every drop of solution.)
  9. Continue whirring in short bursts for another minute.
  10. Pour the emulsion into the waterbath container, making sure to get as much as possible with a scraper. Pour the pre-heat water back into the empty Tornado, replace the lid and whirl a couple of seconds. (Tip: If you skip this step, it will be very hard to clean the Tornado.)
  11. Check the waterbath temperature to make sure it's still at 52-53°C. Adjust if necessary.
  12. Spritz the surface of the emulsion with Everclear and gently stir the emulsion for three minutes with a plastic spoon. (Check the waterbath temperature to make sure it's still at 52-53°C.)
  13. Fluff the bloomed Gel B with the tines of a plastic fork. Switch to a plastic spoon, and over 2 minutes time incorporate B into the emulsion (i.e. add it to the emulsion with stirring, including stirring up from the bottom). When it has all been added, stir an additional minute for 3 minutes total. (Tip: Total times, in the heat and out, are emulsion variables. They are not hard and fast rules, but do take notes if your procedure varies so that you can calibrate cause and effect between makes.)
  14. Divide the emulsion between two canning jars. (Pour through a stainless steel tea strainer. The tornado makes a frothy mix. You may need to press the emulsion through the strainer with a scraper. Try to divide the emulsion evenly. Place a double layer of plastic wrap over the top of each jar and secure with the lid ring. (Tip: You don't want to use the metal lids that comes with the jar. They will react unfavorably with the emulsion.)
  15. Immediately refrigerate in lightproof canisters pre-chilled with a half inch of cold water. (Tip: Every household goods store I've been in sells a version of stainless canister with a snap-down plastic lid. Place several layers of black plastic -cut up trash bags- between the canister and the lid.)

ADDING FINALS BEFORE COATING

Preheat crockpot waterbath to 50-52°C.

Preheat a waterbath on the hot plate to 43°C.

Have ready:

  • Dropper bottle of 1% Potassium iodide (KI). (To make: Mix 1g KI with 100g hot water)
  • Dropper bottle of Photoflo 600.
  • Dropper bottle of glyoxal.
  • Coating tools and surfaces.
  • Precut paper and small pieces of adhesive tape (I tear off about 36 1-inch pieces and line them up on the clothesline over my sink.)
  • Small jar of Everclear.
  • Strainers (tea and gold mesh coffee filters) and plastic canning funnel.
  • Hot distilled water.
  • Wash buckets (one with hot soapy water, one with hot clean water).
  • A second cafe glass (or quart canning jar) sitting in a quart-size glass measuring cup or dish, with room temperature water as high as possible before the cafe glass is unstable.

GO TO SAFELIGHT

Melt one jar (1/2 batch) of emulsion: Remove jar from the lightproof container and place in a 40°C waterbath (have the water level at about the height of the top of the emulsion). Stick a thermometer through the plastic wrap into the emulsion. When the temperature of the emulsion hits about 38°C, remove the plastic wrap and gently stir with a clean plastic spoon until the emulsion is 41-42°C.

Strain the melted emulsion through a stainless steel tea strainer into the cafe glass in the crockpot. Keep the waterbath temperature at 49-51°C. While constantly stirring with a plastic spoon, add 15 drops 1% KI solution at about a drop per second, stir one minute. In the same manner, add 12 drops Photoflo 600, stir one minute. Add 15 drops glyoxal and then spritz the surface of the emulsion with Everclear. Remove the glass from the waterbath and wipe the outside dry. Pour into the second cafe glass through a stack of two or three gold mesh coffee filters. Spritz with Everclear. Set the water-jacketed emulsion on the hot plate.

Begin coating. (More about coating here.) (Tip: The waterjacket should warm up at close to the same rate as the emulsion cools. This keeps the emulsion at about the same temperature during coating. A little experience with your workflow will quickly help you determine your temperature parameters.)

The first coating pass with tell you two things:

1) Is the emulsion cool enough? If the coating is too warm it will go on too thin and you'll be able to see the dull paper through the shiny emulsion. Just wait a couple of minutes, give the emulsion a gentle stir with a clean plastic spoon, and try again. Mark this first sheet because it's not wasted. It can be cut into test strips when you start printing.

2) Is the surfactant right? If you see air bubbles or spots (repellency indicators) add another drop of Photoflo 600 and give a gentle stir.

A few more tips:

  • Tiny bubbles, often in a cluster, indicate that you probably added air during the emulsion take-up. Have an atomizer bottle of Everclear close at hand and immediately spritz the bubble patch from about 4 inches. The bubbles should disappear. If they remain, don't try again. After the emulsion starts to set, Everclear can leave its own marks on the surface. Make note of the location of the defect and avoid printing on that area.
  • Keep a black permanent marker close at hand. Right after coating, the surface of the emulsion is shiny and any and all defects are plainly visible. It is a simple matter to make a map along the uncoated edge of the paper to guide your printing.
  • After the paper is dry, and you start to stack the sheets for storage in a paper safe (or light proof bag) triage the sheets. Start with the 'ugly' ones on top. These will be your test strips and you'll soon value them. They eliminate the stress of cutting up perfect sheets for testing ;-)
  • One defect that doesn't show up until printing is "slugs". If you see them, you'll recognize them. Good straining all but eliminates the problem.


Copyright © The Light Farm